Say hello to the ultimate weeknight hero: Air Fryer Chicken Katsu! This recipe delivers incredibly crispy, golden-brown chicken with a wonderfully juicy interior. Forget the mess and excessive oil of deep-frying; your air fryer makes achieving this Japanese comfort food classic quick and easy. Get ready for a healthier take on a family favorite that doesn’t compromise on flavor or texture.
Table of Contents
Why You’ll Love This Air Fryer Chicken Katsu

- Ultimate Crispiness: Achieve that perfect golden crunch with minimal oil, thanks to your air fryer.
- Juicy & Tender: Every bite reveals succulent, moist chicken, a delightful contrast to the crispy exterior.
- Minimal Mess: No splattering oil or greasy cleanup, just straightforward cooking.
- Ready in 30 Minutes: This swift recipe is ideal for busy evenings when time is precious.
- Weeknight Winner: A healthier and quicker alternative to traditional fried chicken katsu, perfect for any night.
Ingredients
Crafting this delicious Air Fryer Chicken Katsu requires a few simple components, easily found at any grocery store.
- Chicken Breast: Four boneless, skinless chicken breasts, about ½ pound each, form the core of this dish.
- All-Purpose Flour: This creates the essential base for your dredging station, helping the wet batter adhere.
- Water: Use this to adjust the consistency of your wet batter, making it smooth and pourable.
- Large Eggs: Essential for the wet batter, they bind the flour and seasonings and help the panko stick.
- Kosher Salt: Generously season both the chicken and the batter for optimal flavor.
- Black Pepper: Adds a subtle kick and enhances the overall seasoning profile.
- Garlic Powder: Infuses the batter with a savory, aromatic depth that complements the chicken.
- Panko Breadcrumbs: These Japanese-style breadcrumbs are crucial for achieving that characteristic light, airy, and extra-crispy texture.
- Neutral Oil Spray: A light spray ensures superior browning and crispness in the air fryer.
Notes & Substitutions
Panko breadcrumbs are flakier and absorb less oil than regular breadcrumbs, making them key for the best crispness in this Air Fryer Chicken Katsu. Feel free to use boneless, skinless chicken thighs for a slightly richer flavor and even juicier results. For a gluten-free version, simply swap all-purpose flour for a 1:1 gluten-free baking flour and use gluten-free panko breadcrumbs. You can use various neutral oil sprays like avocado, canola, or grapeseed oil for spraying the katsu.
Equipment
You only need a few basic tools to make fantastic Air Fryer Chicken Katsu.
- Air fryer: Essential for achieving crispy results (either basket or oven style works).
- Meat mallet or rolling pin: To pound the chicken to an even thickness.
- Shallow bowls or trays: Three are needed to set up your efficient dredging station.
- Internal meat thermometer: For safely checking the chicken’s doneness.
Instructions
Let’s get cooking! Follow these simple steps to create perfectly crispy Air Fryer Chicken Katsu.
Prepare Chicken
- Start by preparing your chicken breasts. Take each boneless, skinless chicken breast and place it between two sheets of parchment paper or plastic wrap.
- Using a meat mallet or a rolling pin, pound the chicken evenly until it’s about ½-inch thick. This ensures even cooking and tenderness.
- Once pounded, generously season both sides of the chicken with kosher salt and black pepper.
- Set the seasoned chicken aside to dry brine while you prepare the dredging station. This step helps draw moisture out of the chicken, leading to a juicier final product. Many culinary experts agree that dry brining chicken leads to more flavorful and tender results.
Set Up Dredging Station
- In a large, wide bowl, combine the two large eggs, ½ cup all-purpose flour, ½ teaspoon kosher salt, ½ teaspoon black pepper, and 1 teaspoon garlic powder.
- Whisk these ingredients together thoroughly until they are well combined. Gradually add 1-2 tablespoons of water at a time, mixing until the consistency of the batter is slightly thinner than pancake batter. This ensures a smooth, even coating.
- In a separate shallow dish or tray, spread out the 2 cups of panko breadcrumbs. Arrange your seasoned chicken, wet batter bowl, and panko dish in an assembly line for easy coating.
Coat the Chicken
- Take one pounded chicken breast and dip it fully into the wet batter, ensuring it’s completely covered. Lift the chicken and allow any excess batter to drip off.
- Immediately transfer the battered chicken to the dish of panko breadcrumbs. Thoroughly coat the chicken with panko, pressing the breadcrumbs firmly onto the filet with your hands.
- Make sure there are no dry spots and that the panko adheres well to all surfaces. This firm press is crucial for achieving that signature crispy crust on your air fryer chicken katsu.
- Place the coated chicken on a clean plate or cutting board and let it rest for a few minutes. This allows the panko to set, preventing it from falling off during cooking. Repeat this process for all four chicken breasts.
Air Fry Katsu
- If your air fryer model requires preheating, preheat it to 350°F (175°C) according to manufacturer instructions.
- Once ready, carefully place the coated chicken katsu in a single layer in the air fryer basket. Avoid overcrowding; if necessary, cook in batches to ensure even cooking and maximum crispness.
- Lightly spray the top side of each chicken piece with neutral oil spray, like canola or avocado oil. Air fry at 350°F (175°C) for 10 minutes. After 10 minutes, open the air fryer, lightly spray the top again, then flip the chicken.
- Spray the bottom (now top) side as well. Continue air frying for another 4-6 minutes, or until the crust is golden brown and the internal temperature of the thickest part of the chicken reaches a safe 165°F (74°C) when checked with an internal meat thermometer.
Serve Immediately
- Once cooked to perfection, carefully remove the crispy Air Fryer Chicken Katsu from the air fryer.
- Transfer it to a cutting board. Let it rest for a minute or two before slicing it into ½-inch strips.
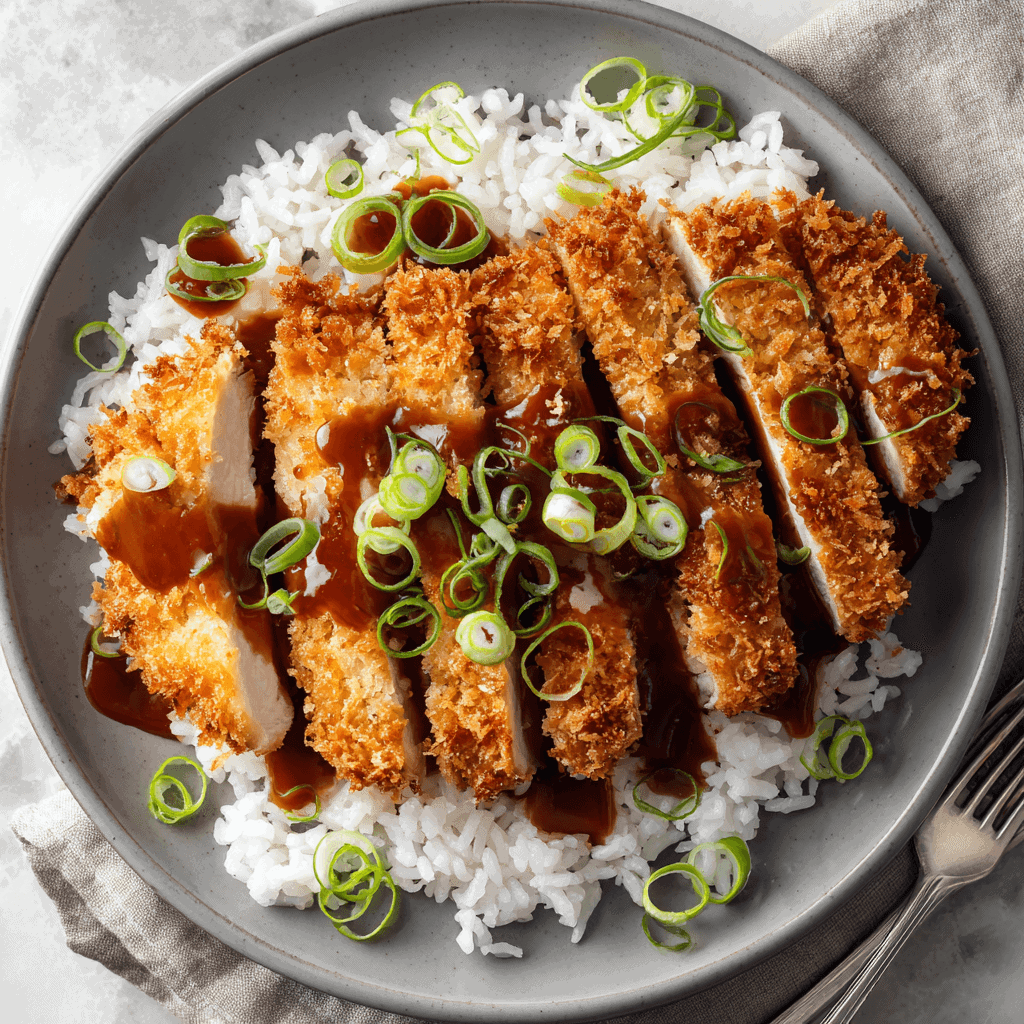
- Serve your delicious chicken katsu immediately with your favorite accompaniments, such as fluffy white rice and a generous drizzle of savory Tonkatsu sauce. Enjoy the satisfying crunch and tender interior!
Pro Tips & Troubleshooting
- Dry Brining: Seasoning the chicken ahead of time, even for 15-20 minutes, helps draw out moisture and tenderize the meat, leading to juicier results.
- Even Thickness: Pounding your chicken to a uniform ½-inch thickness is essential for ensuring it cooks evenly throughout.
- Panko Adhesion: Don’t be shy! Press the panko breadcrumbs firmly onto the chicken to ensure maximum crispness and prevent them from falling off.
- Don’t Overcrowd: Cooking in batches is key. Overlapping chicken pieces will steam instead of crisp, leading to a less desirable texture.
- Oil Spray Technique: Ensure full and even coverage with your neutral oil spray for superior browning and that beautiful golden-brown crust.
- Internal Temperature: Always verify doneness with an internal meat thermometer. Chicken is safe to eat at 165°F (74°C).
- Air Fryer Models: Air fryer wattages and designs vary, so adjust cook times as needed. Always keep an eye on your food.
- Prevent Burning: Monitor the chicken closely, especially towards the end of the cooking cycle, to achieve perfect golden crispness without burning.
Serving, Storage, and Variations

This versatile Air Fryer Chicken Katsu is a fantastic base for many delicious meals.
Serving Suggestions
The classic way to enjoy chicken katsu is sliced and served alongside steaming white rice and a generous drizzle of sweet and savory Tonkatsu sauce. For an authentic experience, add a side of shredded cabbage or a sprinkle of pickled ginger. It also pairs wonderfully with a simple green salad for a lighter meal.
Consider using it to make a delicious katsu curry or transforming it into an amazing katsu sandwich with soft bread and a dollop of Japanese mayo.
Storage Instructions
If you have any delicious leftovers, allow the Air Fryer Chicken Katsu to cool completely before storing. Place it in an airtight container and refrigerate for up to 3-4 days. This helps maintain its quality and prevents spoilage.
Reheating Tips
For the best results and to reclaim that coveted crispiness, reheat your leftover katsu in the air fryer. Preheat it to 350°F (175°C) and air fry for 5-7 minutes, or until heated through and crispy again. Avoid using the microwave if possible, as it tends to make the crust soggy.
Recipe Variations
Beyond chicken, try making Air Fryer Pork Katsu using boneless pork loin cutlets. Experiment with different seasonings in your panko mix, adding a pinch of dried herbs, smoked paprika, or a touch of onion powder. For those who like a little heat, spice it up with a dash of cayenne or chili powder in the batter. You can also explore various dipping sauces beyond Tonkatsu, such as a lemon-garlic aioli, spicy mayo, or a sweet and sour sauce.
Nutrition
The following nutrition information is an approximation per serving of this Air Fryer Chicken Katsu recipe, based on four servings. Please note that exact values can vary depending on specific ingredients and preparation methods.
| Nutrient | Amount |
|---|---|
| Calories | 180 kcal |
| Carbohydrates | 34 g |
| Protein | 6 g |
| Fat | 2 g |
| Saturated Fat | 0.4 g |
| Polyunsaturated Fat | 1 g |
| Monounsaturated Fat | 0.3 g |
| Cholesterol | 1 mg |
| Sodium | 513 mg |
| Potassium | 92 mg |
| Fiber | 2 g |
| Sugar | 2 g |
| Vitamin A | 2 IU |
| Vitamin C | 0.02 mg |
| Calcium | 60 mg |
| Iron | 2 mg |
Frequently Asked Questions
How do I get my chicken katsu crispy in the air fryer?
To ensure ultimate crispness, firmly press the panko breadcrumbs onto the chicken, avoid overcrowding the air fryer basket, and lightly spray both sides with neutral oil. These steps prevent steaming and promote even browning.
Can I use frozen chicken for this recipe?
It’s best to use thawed chicken breasts for this recipe. Frozen chicken will not pound evenly and may result in a watery batter and less crispy crust.
What kind of oil spray should I use?
A neutral oil spray like avocado, canola, or grapeseed oil is ideal. These oils have a high smoke point and won’t impart strong flavors, allowing the chicken’s taste to shine.
Can I prepare air fryer chicken katsu ahead of time?
You can pound and season the chicken, and even prepare the dredging station ingredients in advance. However, for the crispiest Air Fryer Chicken Katsu, coat the chicken with panko and cook it right before serving.
What are some good dipping sauces for chicken katsu?
Classic Tonkatsu sauce is always a winner. Other great options include Japanese mayonnaise, spicy mayo, a squeeze of fresh lemon, or even a sweet chili sauce.
Can I make this recipe gluten-free?
Absolutely! Simply substitute the all-purpose flour with a 1:1 gluten-free flour blend and use gluten-free panko breadcrumbs for a delicious gluten-free version.
Conclusion
There you have it – a perfectly crispy, incredibly juicy Air Fryer Chicken Katsu that’s simple enough for any weeknight. This recipe delivers all the satisfying crunch and flavor you crave, without the fuss or grease of deep-frying. It’s a healthier, faster way to enjoy a beloved dish, making delicious homemade meals a breeze.
Give this recipe a try and transform your dinner routine; your taste buds (and your family) will thank you! We can’t wait to hear how much you loved it, so be sure to share your feedback and photos!
Crispy Air Fryer Chicken Katsu Recipe
Ingredients
Equipment
Method
- Pound chicken breasts to 1/2″ thickness, season with salt and pepper, and set aside to dry brine.
- In a large bowl, whisk together eggs, flour, salt, pepper, and garlic powder, adding water as needed to achieve a thin pancake batter consistency.
- Place panko breadcrumbs in a separate tray next to the wet batter.
- Dip each chicken breast in the egg mixture, allow excess to drip, then immediately coat thoroughly with panko, pressing to ensure it adheres.
- Place breaded chicken in the air fryer basket, spray with oil, and air fry at 350°F for 10 minutes. Flip, spray again, and cook for another 4-6 minutes until golden and the internal temperature reaches 165°F.
- Serve the crispy chicken katsu hot with rice, katsu sauce, and pickled ginger.
Nutrition
Notes
Tried this recipe?
Let us know how it was!Looking for more comfort recipe like this? Come hang out with me over on Facebook and Pinterest where I drop new recipes, family favorites, and quick how-to guides almost every day.


