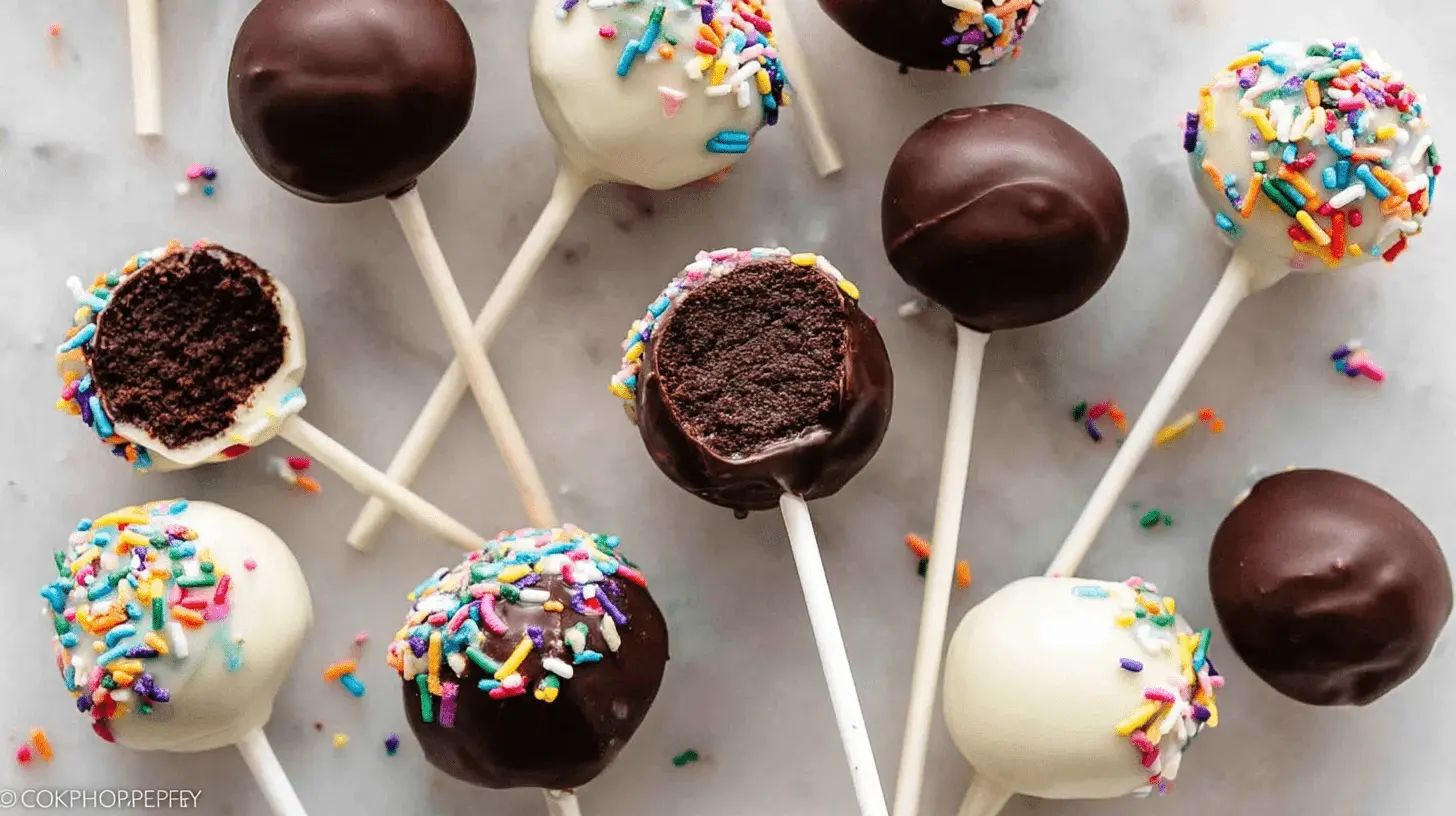
Crafting Chocolate Cake Pops at home is a delightful adventure. These fun, bite-sized treats feature rich chocolate cake mixed with frosting, then coated in a sweet shell. Forget dry, flavorless store-bought versions; these homemade cake pops offer superior taste and a perfectly moist texture. Follow our straightforward, step-by-step guide to create these edible gems.
Table of Contents
Why You’ll Love These Chocolate Cake Pops

You will enjoy making and sharing these delightful cake pops for many reasons.
- Rich Flavor: Enjoy a deep, decadent chocolate taste in every bite.
- Perfectly Moist Texture: The combination of cake and frosting creates a wonderfully soft and tender interior.
- Fun Activity: Making these treats is a creative and enjoyable process, especially for families.
- Party Favorite: They are ideal for celebrations, birthdays, or as a thoughtful homemade gift.
- Superior Quality: Our homemade Chocolate Cake Pops taste much better than pre-made versions.
- Customizable: Adapt them with different coatings and decorations to match any theme.
Ingredients
Gather these items to create your own Chocolate Cake Pops from scratch. Using quality ingredients makes a difference in the final outcome.
- For the Chocolate Cake:
- 1 cup (125g) all-purpose flour (spooned & leveled)
- 1 cup (200g) granulated sugar
- 6 Tablespoons (32g) unsweetened natural cocoa powder (1/3 cup + 1 Tbsp)
- 1/2 teaspoon baking soda
- 1/4 teaspoon salt
- 1/2 cup (120ml) canola, vegetable, or melted coconut oil
- 2 large eggs, at room temperature
- 1 teaspoon pure vanilla extract
- 1/2 cup (120ml) hot water
- For the Chocolate Frosting:
- 6 Tablespoons (85g) unsalted butter, softened to room temperature
- 3/4 cup (90g) confectioners’ sugar
- 1/2 cup (41g) unsweetened natural or Dutch-process cocoa powder
- 2–3 teaspoons heavy cream or milk
- 1/2 teaspoon pure vanilla extract
- For the Coating & Topping:
- 24 ounces (680g) candy melts (or semi-sweet chocolate bars)
- Sprinkles (optional)
Notes & Substitutions
- Natural cocoa powder gives a classic chocolate flavor, while Dutch-process cocoa offers a darker color and milder taste.
- For the cake, avocado oil works well as an alternative to canola or vegetable oil. When choosing your coating, candy melts are convenient and dry quickly, but you can also use quality semi-sweet chocolate bars for a richer flavor.
- If your chocolate coating seems too thick, thin it with a teaspoon of coconut oil or vegetable shortening until it reaches the right consistency for dipping.
As many baking experts recommend, using room temperature ingredients like eggs and butter helps them blend more smoothly into the batter.
You can also experiment with other frosting flavors, like cream cheese or peanut butter, for a unique twist.
Equipment
Having the right tools helps make the process smooth.
- 9-inch pan (round or square)
- Handheld or stand mixer
- Large mixing bowls
- Whisk
- Baking sheet
- Parchment paper or silicone baking mat
- 2-cup liquid measuring cup (for dipping)
- Double boiler (optional, for melting chocolate)
- Lollipop sticks
- Styrofoam block or cardboard box (for drying)
Instructions For The Best Chocolate Cake Pops

Follow these steps to create your delightful Chocolate Cake Pops. Take your time with each stage for the best results.
Prepare the Chocolate Cake
Preheat your oven to 350°F (177°C). Grease a 9-inch pan. Whisk flour, granulated sugar, cocoa powder, baking soda, and salt together in a large bowl. In a separate medium bowl, whisk oil, eggs, and vanilla.
Pour the wet ingredients into the dry ingredients, add the hot water, and whisk until combined, checking for any dry pockets. Pour the batter into the prepared pan and bake for 25–27 minutes, or until a toothpick inserted in the center comes out clean. Allow the cake to cool completely in the pan on a wire rack.
Make the Chocolate Frosting
With a mixer, beat the softened butter on medium speed until creamy, about 2 minutes. Scrape down the sides of the bowl as needed. Add confectioners’ sugar, cocoa powder, 2 teaspoons of heavy cream or milk, and vanilla extract.
Beat on low speed until combined. Increase to high speed and beat for 3 minutes until smooth and fluffy. If the frosting seems too thick, add another teaspoon of milk or cream.
Combine Cake & Frosting
Crumble the completely cooled cake into the bowl on top of the frosting. Ensure there are no large lumps of cake. Turn the mixer to low speed and beat the frosting and cake crumbles together until thoroughly combined. This mixture should be dense and uniform.
Form Cake Balls
Measure 1 scant Tablespoon (about 20g) of the moist cake mixture. Roll this portion into a smooth, compact ball. Place the formed cake balls on a baking sheet lined with parchment paper or a silicone mat. Refrigerate the cake balls for 2 hours or freeze for 1 hour until they are firm.
Prepare the Coating
Melt the candy melts or chopped chocolate in a 2-cup liquid measuring cup, which works well for dipping. Microwave in 20-second increments, stirring after each increment until the coating is completely melted and smooth.
Alternatively, use a double boiler. Let the coating cool for a few minutes before dipping. If the coating is too hot, it can cause cracking.
Dip & Decorate Cake Pops
Remove only 2–3 cake balls from the refrigerator at a time to keep the rest cold. Dip one end of a lollipop stick about 1/2 inch into the melted coating, then insert it into the center of a cake ball, pushing it halfway to three-quarters through.
Dip the entire cake ball into the coating, making sure it covers the base where the stick meets the cake ball. Gently tap the stick against the edge of the measuring cup to allow any excess coating to drip off.
Add sprinkles immediately if desired. Insert the finished Chocolate Cake Pops upright into a styrofoam block or cardboard box to dry completely. Repeat with the remaining cake balls, always working with a few at a time to maintain their coldness. The cake balls must be very cold for successful dipping.
Set & Store
Allow the coating on your cake pops to set completely, which usually takes about an hour at room temperature. Once set, store your Chocolate Cake Pops in the refrigerator for up to 1 week.
Pro Tips for Perfect Chocolate Cake Pops
- Achieving outstanding cake pops involves attention to a few key details. Ensure the cake is completely cooled before crumbling; warm cake will create a greasy mix.
- Maintain the proper cake-to-frosting ratio; too much frosting can make the balls too soft. Consistent cake ball size, around 1 Tablespoon or 20g, ensures even dipping and presentation.
- Chill cake balls thoroughly before dipping; this helps them stay on the stick and prevents crumbling.
- Dip the lollipop stick into the coating first, then into the cake ball, for extra stability. Control the melted coating temperature; it should be warm enough to flow but not too hot, which can cause cracking.
- Use a deep, narrow container for dipping to fully submerge the cake balls easily. Let excess coating drip off gently by tapping the stick. Use a stand or box for upright drying, preventing flat spots.
- If cracking occurs, your coating might be too hot or the cake balls too cold; adjust accordingly. If cake balls fall off the stick, they may not have been cold enough, or they might be too large.
Serving, Storage, & Variations
These cake pops are versatile and keep well, making them ideal for planning ahead.
Serving Suggestions
Serve Chocolate Cake Pops chilled or at room temperature. Arrange them creatively on a platter or in a decorative container for an appealing display. They make lovely additions to dessert tables at any gathering.
Storage Instructions
Refrigerate finished cake pops in an airtight container for up to one week. For longer storage, freeze them for up to six weeks. Thaw frozen cake pops in the refrigerator overnight before serving.
Make-Ahead Tips
You can prepare the cake and frosting a day or two in advance. Store the cooled cake covered at room temperature and the frosting in the refrigerator. You can also form and freeze the undipped cake balls for several weeks. Just thaw slightly in the refrigerator before dipping.
Flavor Variations
Change the frosting flavor to create new experiences. Try a raspberry buttercream or a peppermint frosting for holidays. Stir in a teaspoon of espresso powder to the cake batter for a mocha cake pop. Experiment with different colored candy melts to match party themes, or use white chocolate for a contrasting coating.
Truffle Style
For a simpler approach, skip the sticks entirely and make cake truffles. Roll the cake mixture into balls, dip them, and serve in mini paper liners. A spiral dipping tool can help coat truffles cleanly.
Nutrition Information
Please note, the nutritional values below are estimates based on the provided ingredients and preparation. Actual values may vary depending on specific brands, ingredient variations, and portion sizes. This information is intended for general guidance only.
| Component | Amount (per serving, estimated) |
|---|---|
| Calories | 250-300 |
| Total Fat | 15-20g |
| Saturated Fat | 8-12g |
| Cholesterol | 20-30mg |
| Sodium | 60-80mg |
| Total Carbs | 30-40g |
| Sugars | 25-35g |
| Protein | 2-3g |
Frequently Asked Questions
Can I use a different size cake pan?
Yes, you can use an 8-inch pan, but baking time might be slightly longer. Watch for the toothpick test to confirm doneness.
How can I halve the recipe?
Divide all ingredient quantities by half to make a smaller batch of Chocolate Cake Pops. This works well for a smaller crowd.
What’s the difference between natural and Dutch-process cocoa powder?
Natural cocoa is acidic and provides a lighter chocolate flavor, while Dutch-process cocoa is alkalized, making it darker and milder.
How do I thin my chocolate coating?
Add 1 teaspoon of coconut oil or vegetable shortening to the melted coating and stir until it reaches a smoother, dippable consistency.
Conclusion
Creating Chocolate Cake Pops at home is a rewarding activity that brings smiles and delicious outcomes. This recipe offers a wonderful opportunity for beginners to bake something special and impressive.
By following our detailed instructions and expert tips, you will achieve moist, flavorful treats that outshine any store-bought version. We encourage you to try making these delightful Chocolate Cake Pops for your next gathering or as a sweet surprise. Share your creations and let us know how they turn out in the comments below!

Chocolate Cake Pops
Ingredients
Equipment
Method
- Preheat oven to 350°F (177°C) and grease a 9-inch cake pan.
- Whisk together flour, sugar, cocoa, baking soda, and salt. Mix oil, eggs, and vanilla separately. Combine wet and dry, add hot water, mix well, and bake for 25–27 minutes. Cool completely.
- Beat butter for frosting until creamy. Add sugar, cocoa, cream, and vanilla. Beat until fluffy. Adjust consistency if needed.
- Crumble cooled cake into the frosting and mix until uniform.
- Roll into 1 tbsp-sized balls (about 20g) and place on parchment-lined baking sheet. Chill for 2 hours or freeze for 1 hour.
- Melt candy melts or chocolate in microwave-safe cup or double boiler. Cool slightly before dipping.
- Dip stick into coating, insert into cake ball, then dip whole pop. Let excess drip off and add sprinkles if desired. Stand upright to dry.
- Repeat with remaining cake balls. Let coating set completely before storing.
Nutrition
Notes
- Use room temperature ingredients for smoother batter.
- Candy melts dry faster, while semi-sweet chocolate offers richer flavor.
- Thin coating with coconut oil if needed.
Tried this recipe?
Let us know how it was!Looking for more comfort recipe like this? Come hang out with me over on Facebook and Pinterest where I drop new recipes, family favorites, and quick how-to guides almost every day.


